This issue is usually happened when an application installation not correctly renamed or deleted the registry entry PendingFileRenameOperations.

Belo are the work around for this issue by following these steps:

1. Open Registry Editor. Click Start –> Run, input “regedit” and press Enter.

2. Go to HKEY_LOCAL_MACHINE\SYSTEM\CurrentControlSet\Control\Session Manager, and delete any value in “PendingFileRenameOperations” key.

One day my one friend suddenly found that backup files are larger than database.

As per general standard, there is no way that a particular full database backup file can be larger than the database size.  A full backup contains the entire database’s data files that are used, and the active portion of the transaction log during the backup.  It is thus possible that the backup file is significantly smaller than the database size, but definitely 100% sure it cannot be larger.

The reason for the large backup file is because the file contains multiple backup sets.  A backup file will contain multiple backup sets if it repeatedly back up to the same file, without using the INIT or FORMAT options.

As per BOL, “Indexes can be created on a temporary table. When the table is dropped or the session ends, all indexes and triggers are dropped

The general rule is to avoid using temp tables, usually in favor of derived tables or table variables, but there are times when it seems that nothing else will do the job. Or, maybe we just inherit complex code that already makes extensive use of temp tables. Frequently, query performance against large temp tables can benefit from adding a few well-chosen indexes.

Its Sometimes observed the optimizer is intent on ignoring the very performance-boosting indexes that we’ve just created. This usually happens because the access plans for the temp tables have been generated before the indexes ever existed.

Here is an example.

CREATE TABLE #TblTest (ID int)

CREATE NONCLUSTERED INDEX idx_Test ON #TblTest (ID)

DROP TABLE #TblTest

Temporary tables comply with the same rules as permanent tables when it comes down to indexing. The only difference is in the storage location, which is Tempdb for temporary tables. However, if an index added to a table that is heavily written, just be sure about the write vs. read tradeoff.

Since the temporary table is probably used in a procedure or in a script, it’s depend on code that controls how hardly its hitting the table with writes. INSERTs are faster without indexes in place: if insertion amount of data is so high using lots of multiple statements, we must want to create the index after fully populating the table. UPDATEs and DELETEs have to find the row(s) to modify first, so they could highly benefit from proper indexing.

Generally in Production environment or in some cases there may be a requirement to make a SQL Server table as a read only. In SQL Server, there are many ways to do this. Some of few techniques are as below,

To demonstrate this, here DB name is VIRENDRATEST and Table name is TBLTEST

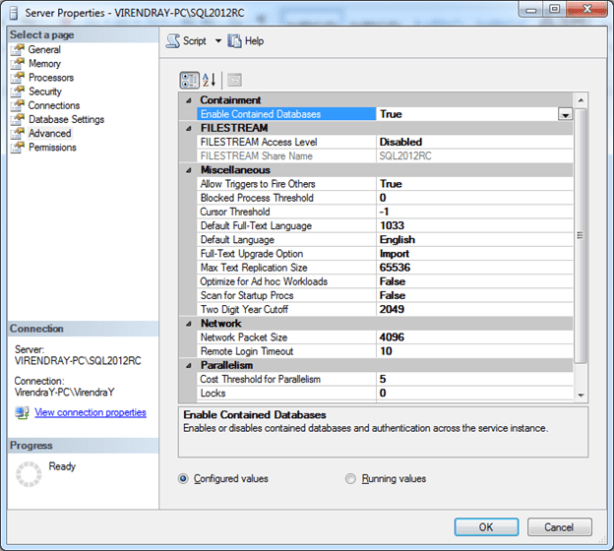
CREATE DATABASE [VIRENDRATEST]
CONTAINMENT NONE
ON PRIMARY
NAME N’VIRENDRATEST’FILENAME = N’D:\TestDataBases\VIRENDRATEST.mdf’ SIZE = 3072KB FILEGROWTH = 1024KB )
LOG ON (NAME=N’VIRENDRATEST_log’,FILENAME=N’D:\TestDataBases\VIRENDRATEST_log.ldf’,SIZE=1024KB FILEGROWTH = 10%)
GO

 And a table TBLTEST as

CREATE TABLE TBLTEST
    ID int NULL,
Name varchar(50NULL )
ON 
[PRIMARY]
GO

To making table as a read only, following techniques may be used

  1. Trigger – Insert, Update, Delete
  2. Put the Table in a Read Only File Group
  3. Create a View
  4. DENY Object Level Permission
  5. Make the Database as Read Only


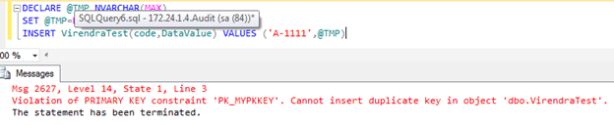
1)  Trigger – Insert, Update, Delete 

Insert, Update and Delete trigger may be implemented on table as

CREATE TRIGGER TrgReadOnly_TblTest ON TblTest
INSTEAD OF INSERTUPDATEDELETE
AS
BEGIN
RAISERROR(‘Table is Read Only’, 16, 1 )
ROLLBACK TRANSACTION
END


2)  Put the Table in a Read Only File Group

We can put Table on a Read only file group.

USE [Master]
GO

ALTER DATABASE [VIRENDRATEST] ADD FILEGROUP [READONLYTABLES]
GO

ALTER DATABASE [VIRENDRATEST] ADD FILE NAME N’READONLYTABLES’FILENAME = N’D:\TestDataBases\VIRENDRATEST.ndf’ ,
SIZE= 2048KB FILEGROWTH = 1024KB ) TO 
FILEGROUP [READONLYTABLES]
GO

CREATE TABLE TBLTEST
ID int NULL,
  Name 
varchar(50NULL )
ON 
[READONLYTABLES]
GO

ALTER DATABASE [VIRENDRATEST] MODIFY FILEGROUP [READONLYTABLES] READONLY

3) Create a View
The easiest solution for making a table as read only is VIEWs. As per below views creations it will prevent DML operation on table.

Create View VwTBLTEST as
select 
ID, Name from TBLTEST
union all
select 0
‘0’ where 1=

  • 4) DENY Object Level Permission

We can deny user level permissions as

DENY INSERTUPDATEDELETE ON TBLTEST TO AnyUserName

DENY INSERTUPDATEDELETE ON TBLTEST TO Public

5) Make the Database as Read Only

Making a Database as a Read Only, it will not allow to anyone to perform any DDL or DML operation on Database. (be sure where is it recommended as per your work environment)

USE [Master]
GO

ALTER DATABASE [VIRENDRATEST] SET READ_ONLY WITH NO_WAIT
GO


Recently I came to know that there is a very small and interesting bug with SQL Sever 2008 RTM release for INSERT statement. Its , when our INSERT fails, its occupy space. For same , below is the explained example.

Let, First create a Table, here its named as ‘VirendraTest’ in my Test Database ‘Virendra’

CREATE TABLE VirendraTest( Code Char(10), DataValue NVARCHAR(MAX)
CONSTRAINT [PK_MYPKKEY] PRIMARY KEY CLUSTERED
(
   Code ASC
WITH (PAD_INDEX = OFF, STATISTICS_NORECOMPUTE OFF, IGNORE_DUP_KEY OFF,
ALLOW_ROW_LOCKS 
ON, ALLOW_PAGE_LOCKS ON) ON [PRIMARY]
)

Now insert a row as

DECLARE @TMP NVARCHAR(MAX)
SET 
@TMP=REPLICATE(‘VIRENDRA’,4000)
INSERT 
VirendraTest(code,DataValueVALUES (‘A-1111’,@TMP)
Lets check used space

sp_spaceused ‘VirendraTest’ true
For me, its showing


Now insert same record again, it will show primary key violation error, but sp_spaceused will give different result.

Let check again used space,

As you seen above, without inserting any records, table space used size increased.

Lets check this query for 1000 loop and check space used.

And now check, used space

To resolve this issue , we can use CLEANTABLE command to release space and to avoid this issue again, there is a KB article http://support.microsoft.com/kb/2295878 about it. Downloaded the cumulative hot-fix and installed it on server and restart server.

CLEANTABLE example,

DBCC CLEANTABLE (DATABASENAME,TABLENAME)
DBCC CLEANTABLE(Virendra,VirendraTest,0) — — 0 for current database

Sometimes we have to work on identity columns and we were not aware about tables and columns which belongs to Identity property. Here are some options to get the tables having identity columns.

  1. SELECT OBJECT_NAME(Object_ID),Name from sys.identity_columns
  2. SELECT OBJECT_NAME(IDas ‘Table Name’Name as ‘Column Name’ FROM syscolumns WHERE status = 0x80 
  3. SELECT OBJECT_NAME(Object_ID), Name from sys.columns where is_identity=1
  4. SELECT OBJECT_NAME(idas TableName, name as ColumnName FROM syscolumns
    WHERE COLUMNPROPERTY(id, name,‘IsIdentity’)= 1
  5. SELECT OBJECT_NAME(object_idas TableName, name as ColumnName FROM Sys.Columns
    WHERE COLUMNPROPERTY(object_idname‘IsIdentity’= 1
  6. SELECT OBJECT_NAME(Object_ID),Name from sys.identity_columns
  7. SELECT Name,OBJECTPROPERTY(id‘TableHasIdentity’AS TableHasIdentity from sysobjects
    WHERE xtype = ‘U’
  8. SELECT NameOBJECTPROPERTY(object_id‘TableHasIdentity’AS TableHasIdentity from sys.objects
    WHERE type
    ‘U’

It’s very rare to see negative SPID as its not a common things, it may be you have been performing an investigation in SQL Server into a performance issue related to some database blocking issue with as usual sp_who or sp_who2 and you see there SPID as -2 or -3. As a resultant top of a blocking chain with a dozen other transactions behind it trying to acquire resource. Until it’s killed, nothing will happen, but problem is – how to kill negative SPID? If you use KILL -2 it will through an error message as

Msg 6101, Level 16, State 1, Line 1
Process ID -2 is not a valid process ID. Choose a number between 1 and 1024.
( SPID -2 is an orphaned DTC transaction & SPID -3 is a deferred transaction)

The negative SPID is known as a distributed transaction SPID or an orphaned distributed transaction SPID. Negative SPID happened when someone has been killed a distributed transaction SPID. An orphaned distributed transaction SPID to be totally precise. Something that involves MSDTC – The Microsoft Distributed Transaction Coordinator. It’s needed to work on two or more servers at a time and fetch data from many those servers within a transaction, means when a transaction involves data that resides on more than one server, such as when a database record is replicated out to two or more servers, MSDTC needs to become involved.

Though, sometimes, all does not go as well as it should. A server drops off the network or there is a power outage at the distributor server. Something messy which servers are not very good at dealing with, MSDTC usually handles these scenarios very well, ensuring that the rules involving the database ACID properties are adhered to do that everything stays in sync which should, and everyone’s happy about what data is in their tables.

But when MSDTC can’t recover from one of these scenarios, the SPID which is handling the distributed transaction on one or more servers cannot do any more work. The result is an orphaned SPID.

In order to mark this as an orphaned, distributed transaction SPID, SQL Server changes the SPID from a positive number to -2. The only problem is, the SPID may still be holding on to resources like table, page or row locks, and blocking other SPIDs which want to access that database object, But because the KILL command can not handle SPIDs with a value of less than 1, you can not use it to kill a negative SPID, such as this. Hence the need to look up the UOW (Unit of Work) ID of the offending SPID before the process can be terminated. To get UOW values, just use the command as

Select req_transactionUOW from master..syslockinfo where req_spid2

Noted down the UOW values, This will return a 32 digit UOW number like ‘FA4A8712-12D5-11D3-7213-C12345ABC7E9’. Use this UOW to kill the main blocker as

KILL ‘FA4A8712-12D5-11D3-7213-C12345ABC7E9’

Hopefully now everything being great!